Introduction to Crew Management
By 0neye
Note: It is assumed that you have already read my ship design guide. If you haven’t already done so it is highly recommended.
Note: If you want some of this information in a video format, or would like to see a live example you can check out this video.
Why crew management is so important
Crew management is often overlooked. Almost all competitive ships use crew management, but it’s probably not necessary unless you want to be super optimized, right? Well, crew management has a much bigger impact than you might think at first. I can’t stress enough how important proper crew management is to cost-efficiency and logistics.
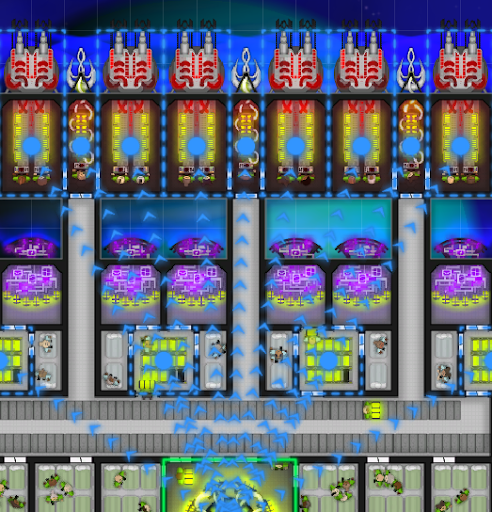
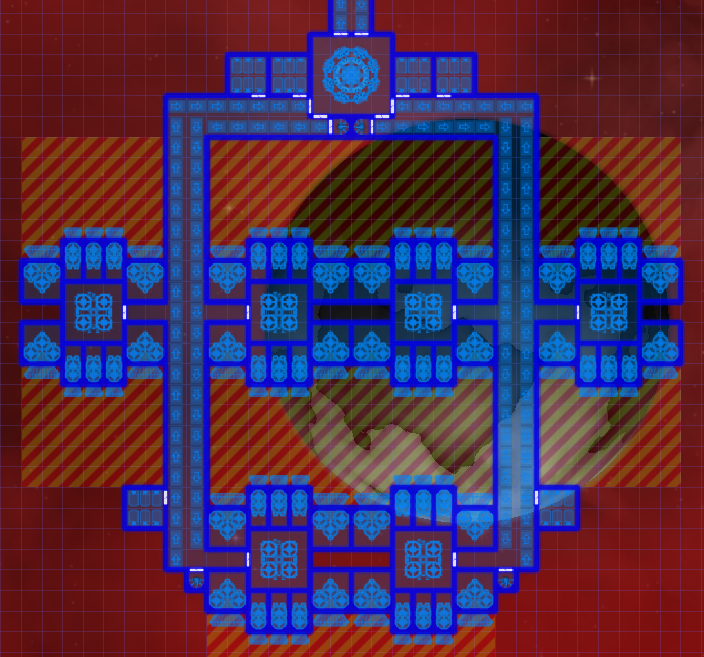
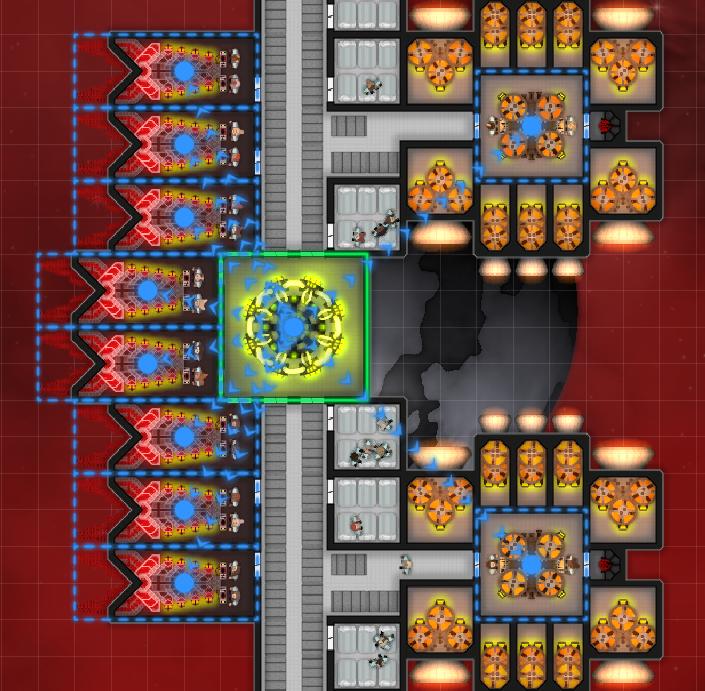
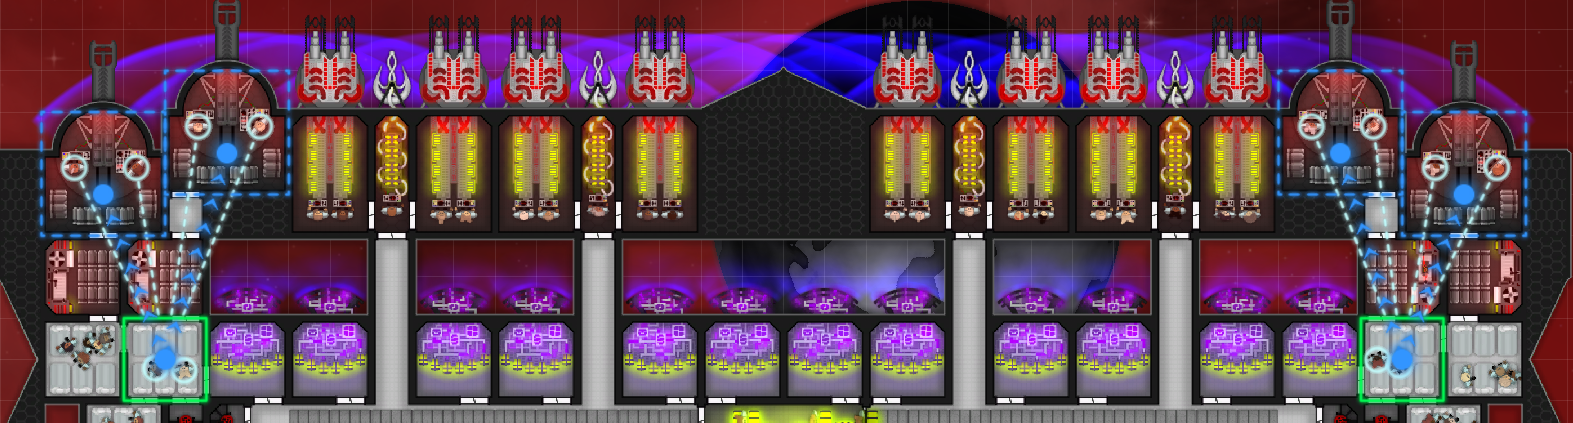
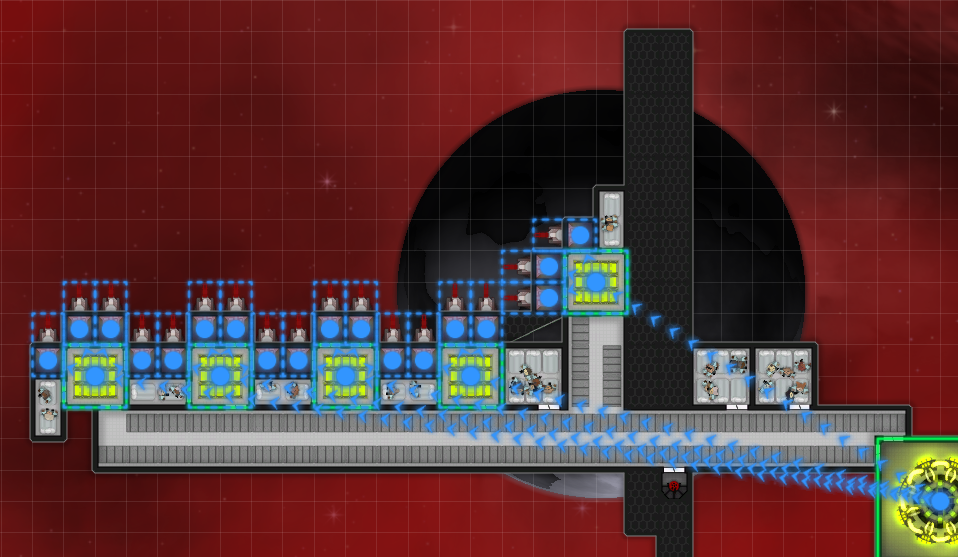
This missile module, WITHOUT crew management, looks like it doesn’t have enough crew.
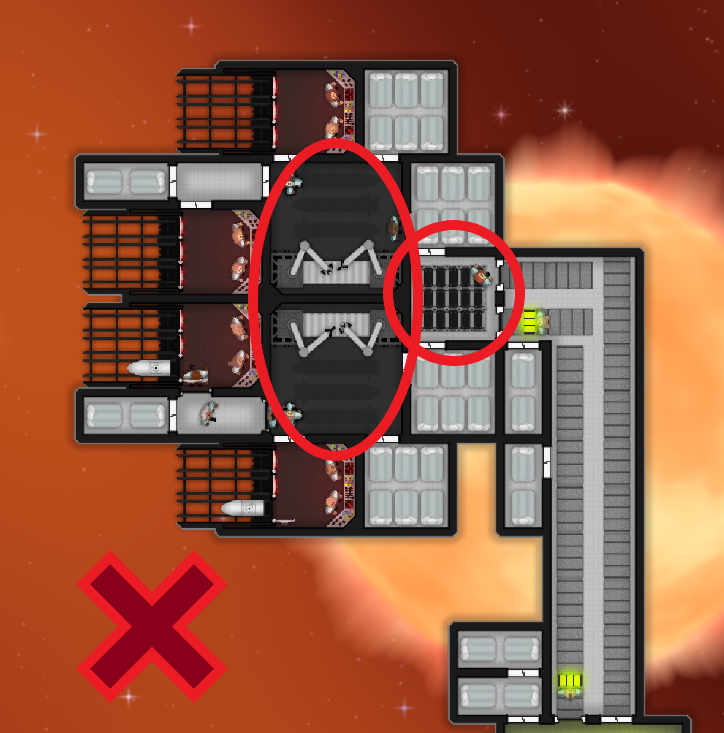
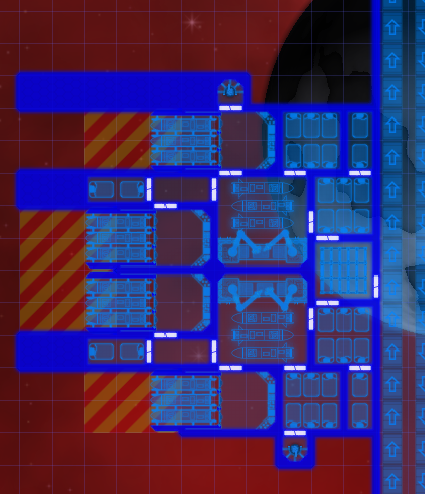
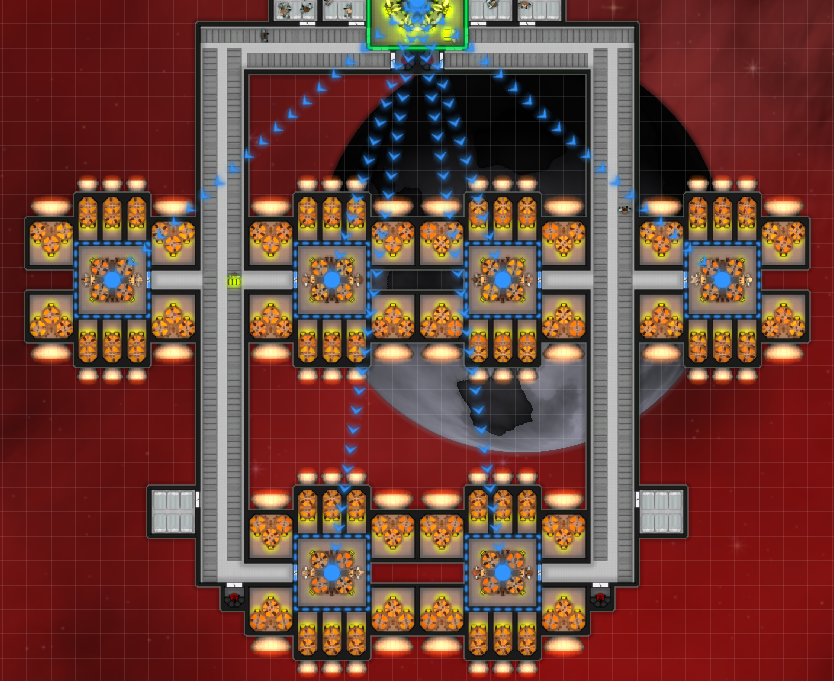
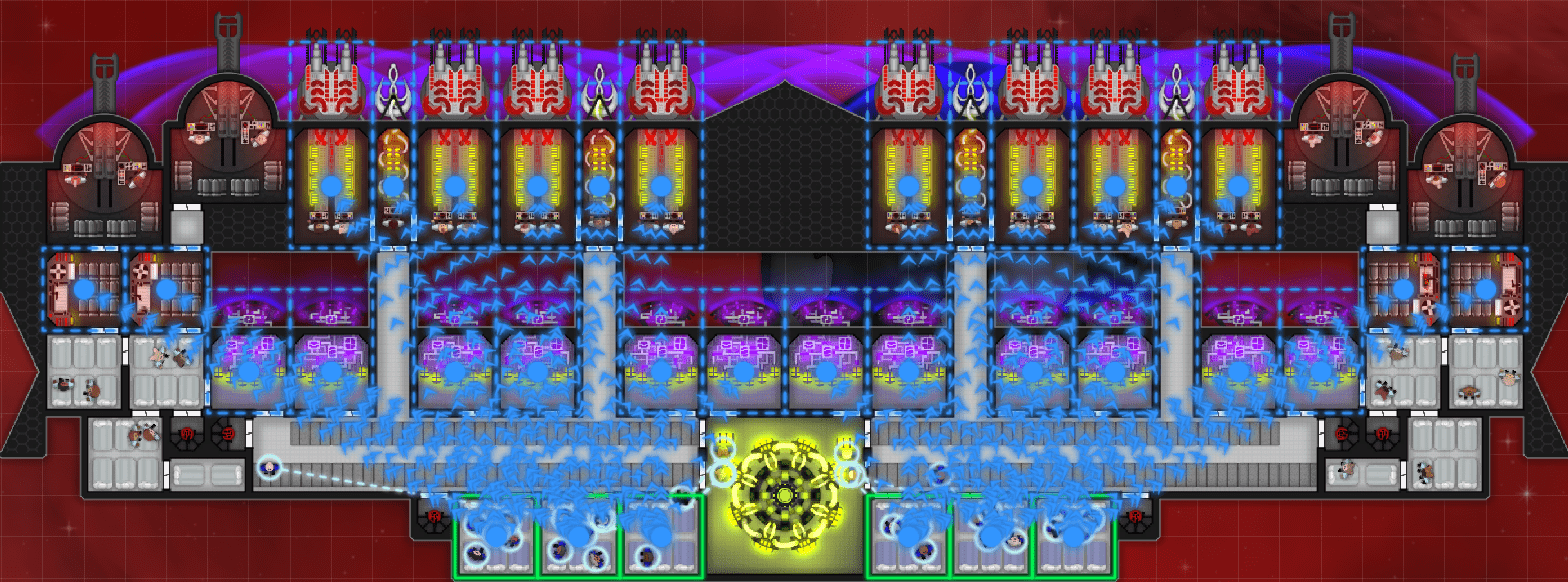
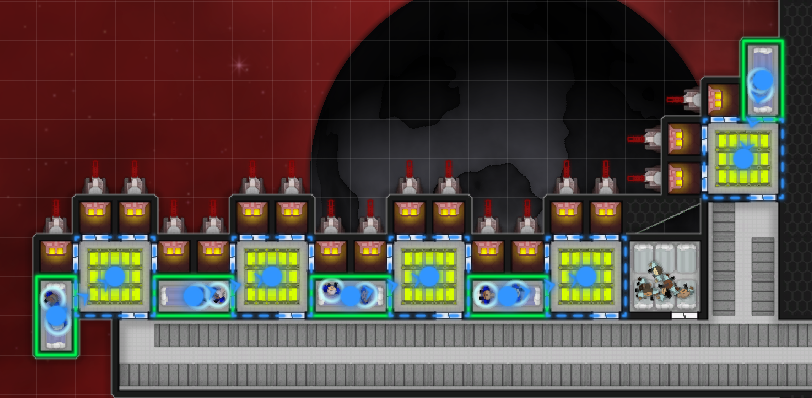
With proper crew management, this module can be almost perfectly efficient, and no more crew is needed. This is the same module WITH crew management:
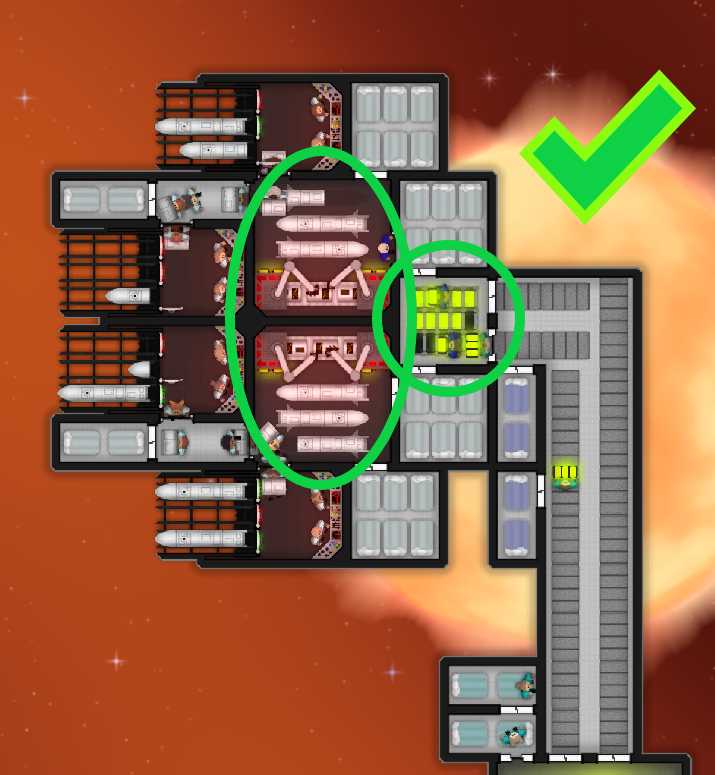
So, how much more crew does it take to get the same result not using crew management? Well, the module using crew management only needs 32 crew for both power distribution and missile hauling.
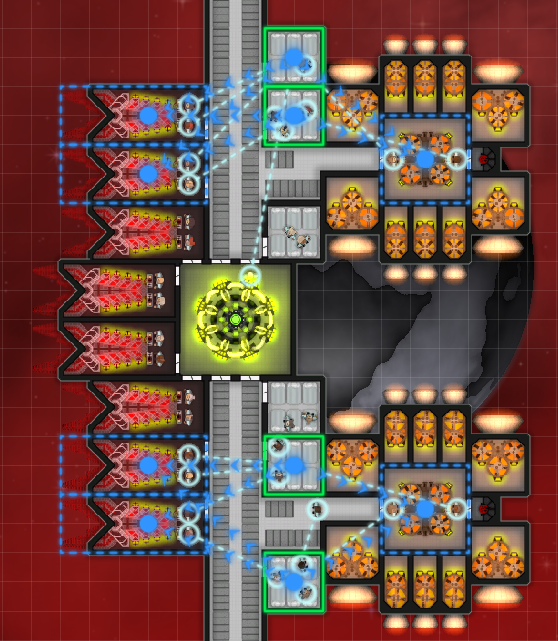
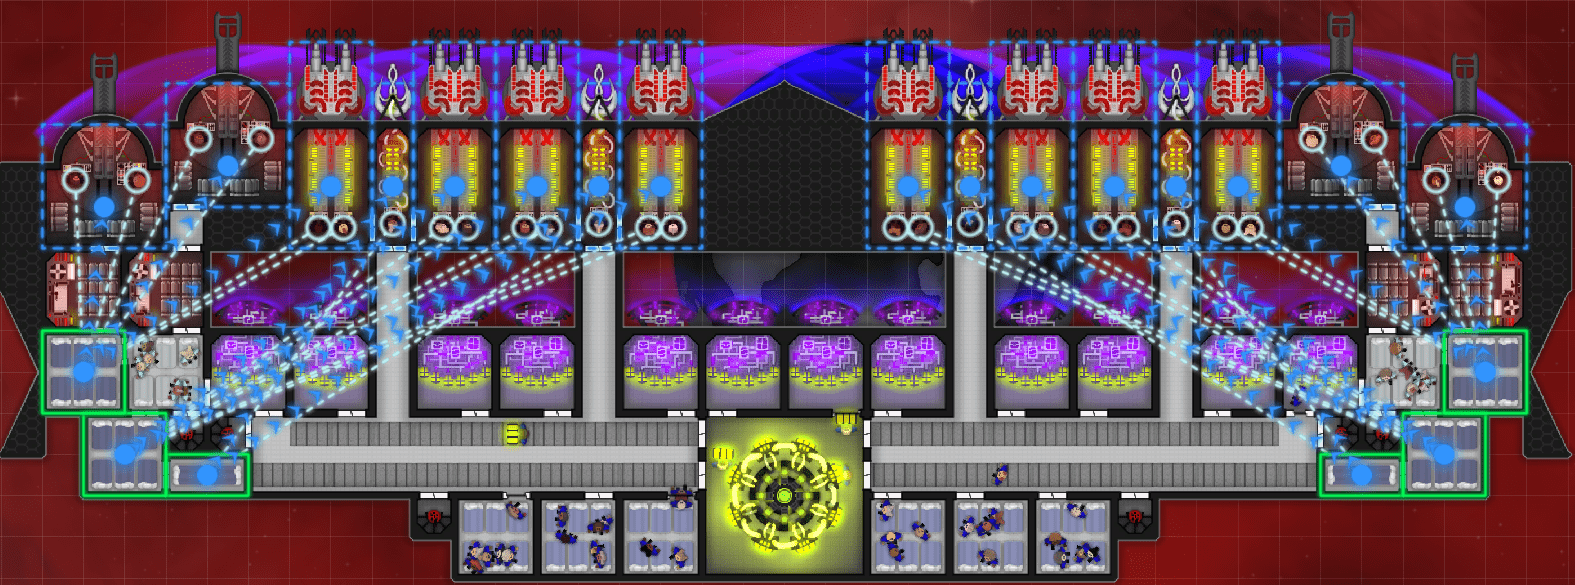
In order to work effectively without crew management, the number of crew has to increase to 52!
Due to the way crew are picked for jobs there needs to be a buffer of 6 extra crew members (above the number used when autofiring) for the module to work properly without crew management. After firing the first 3 missiles the missile launchers become empty, which causes all of the crew to be called to supply missile parts, leaving none for the power storage. So, without the extra crew, the module will quickly run out of power. Of course, all of this can be fixed with crew management.
Basics of crew management
The in-game tutorial goes over the very, very basics of crew management (so read it!) but also doesn’t mention a lot of things.
The reason crew management is so useful is because it allows you to set up your ship so that the crew are always doing the same thing. Crew become inefficient when they are switching tasks since they have to move around to get to the job they’re requested for. Crew management is about getting your crew to continue doing one task over and over to minimize any extra travel time or unnecessary work.
The first thing I need to talk about is right-click assignment, aka “direct assignment”. Direct assignment does different things based on the parts you assign your crew to.
Factories and storages:
When assigning a crew room to a factory the crew will both supply power to the factory and bring supplies the factory produces to consumers and storages.
When assigning a crew room to a storage they will both supply the storage and distribute supplies from the storage to other parts.
Weapons and parts:
- When assigning a crew room to a weapon (or engine room) they will both operate the weapon and supply it with either ammo, missile parts, or power.
- When assigning a crew room to other parts such as PD, shields, or thrusters they will strictly deliver power to such parts.
Reactors:
- When assigning a crew room to a reactor they will do all jobs for that reactor.
Direct assignment is very useful on its own but becomes more useful with the usage of crew roles. For example, assigning a crew room to a power storage and giving it a role that only allows the crew to deliver power to the storage can create a handy supply line from the nearest reactor. Combine that with specialized distribution crew and you’ve got an efficient setup.
Assigning parts:
- You can assign factories, storages, and reactors to parts just like you can crew rooms.
Assigning these factories, storages, and reactors to the parts you want them to supply is a must if you want an efficient crew setup. Power storages and reactors are a great example. Let’s say you have some shields next to a power storage, and the shields are protecting heavy laser blasters that you want to power with your large reactor.
Without assigning your storages and reactor the crew might bring power from your storages to the HLs and from your reactor to the shields, which both defeats the point of the storages for fast shield regen and using large batteries to increase the efficiency of powering HLs.
Crew roles
So, I’ve talked a little bit about how direct assignment works with crew roles, but what exactly do I mean, and what crew roles should you use?
Basically, your crew roles are how you further specify what your crew do after direct assignment. Ideally, you have a role for every possible occasion, but often editing your roles on the fly works just as well. That being said, it is good to have quite a few roles saved as your default (which you can do from the hamburger menu) that you use for different tasks.
What roles should I use?
There are a few “essential” roles that are pretty much required for most ships. I’ll go through them and explain each one.
Storage supply:
A role that only supplies storage seems very limiting, but in many situations where you’re using power storage buffers to power parts far away from large reactors, it can be very helpful. Think of powering PD through storage relays, or missile factories. Storage supply crew are an essential link in the chain of supply, bringing power to storage to get distributed to parts.
Note: In the rare case that you need to supply ammo storage you can edit the priorities of this role to allow for that by going to the bottom of the projectile weapons tab and changing the ammo storage priority.
Setup: Right-click on a 0 priority button (doesn’t matter the part) and click “set all priorities to 0”. Then, go to the power tab and set power storage to priority 9. Finally go to the defense tab and set fire extinguisher to 10.
Power distribution:
The natural companion role to the power storage supply role, the power distribution role distributes power from storages. If you’ve already assigned your power storages, just make sure your distribution role can’t supply them, and then simply assign them to the storage you want to distribute from. Alternatively, you can use power distributors as a general power supply role for direct assigning to parts you couldn’t supply power to with normal crew, such as ammo factories.
Setup: Go to the power tab and set the power storage priority to 0, then go to the projectile weapons tab and right-click on an “operate” priority 0 and click “set all ‘operate’ priorities in ‘projectile weapons’ to 0”. Next, right-click on a “supply bullets” priority 0 and click “set all ‘supply bullets’ priorities to 0”. Lastly, do the same thing in the “missiles and mines” tab for each missile type.
Operator:
A role dedicated to only operating weapons and engine rooms may not seem that useful, after all, the normal crew can do that fine. The advantage of using operator crew is that it allows you to place your supply crew closer to the producers, whether those are reactors or factories. A small (or larger) amount of crew is usually taken from crew rooms for operating things you directly assign them to. This means there are less crew in the room available for supplying things. For example, if you assign a quarters to an engine room two crew will be used to operate the engine room, meaning the quarters has as many available crew as a pair of bunks, which is much less space-efficient. When you may have upwards of 12 engine rooms on a ship, operator crew can mean you have 24 more crew closer to your reactors than you would without them.
Setup: Right-click on a 0 priority button (doesn’t matter the part) and click “set all priorities to 0”. Then, right-click on an “operate” priority 10 and click “set all ‘operate’ priorities to 10”.
Other roles:
Other roles can be useful in certain situations, but shouldn’t be needed on every ship.
For example, you’re making an ion ship with flak for missile defense. If you aren’t fighting a missile barge you’ll most likely not need your flak, but you will need your shields. When fighting a missile barge on the other hand shields to protect the ion tunnel aren’t very useful, but side flak is. So, you can create a role that only operates and supplies ammo to flak, and one that only supplies power to shields. By doing this you can cut your crew needs for these two-part groups in half. If you encounter a missile barge, you can go into your crew management menu and swap the shield crew to flak crew.
Saving your crew roles:
Once you’ve set up your crew roles you can save them as your default by clicking on the 3-line (hamburger) menu to the right of the Undo and Redo buttons in the crew management menu and clicking “Save As My Default Roles”. This menu is also where you can load your default roles onto ships that don’t have them yet.
How to use crew management
There are a few situations where good crew management can be especially helpful. I’ll go over how to assign your crew and what roles to use for each one.
Important note: Crew will use fire extinguishers even if not assigned to them, but only if they still have a high priority. Still, assigning your crew to fire extinguishers is highly recommended. I’m not going to be assigning the crew in these examples to fire extinguishers for the sake of visual clutter, but that doesn’t mean you shouldn’t either.
Missiles:
Crew management probably has the greatest effect on missile ships, so it’s important to know how to set everything up.
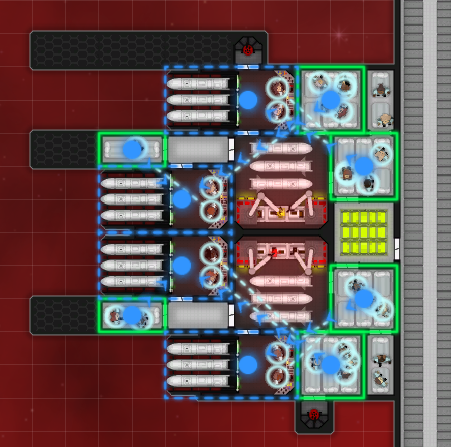
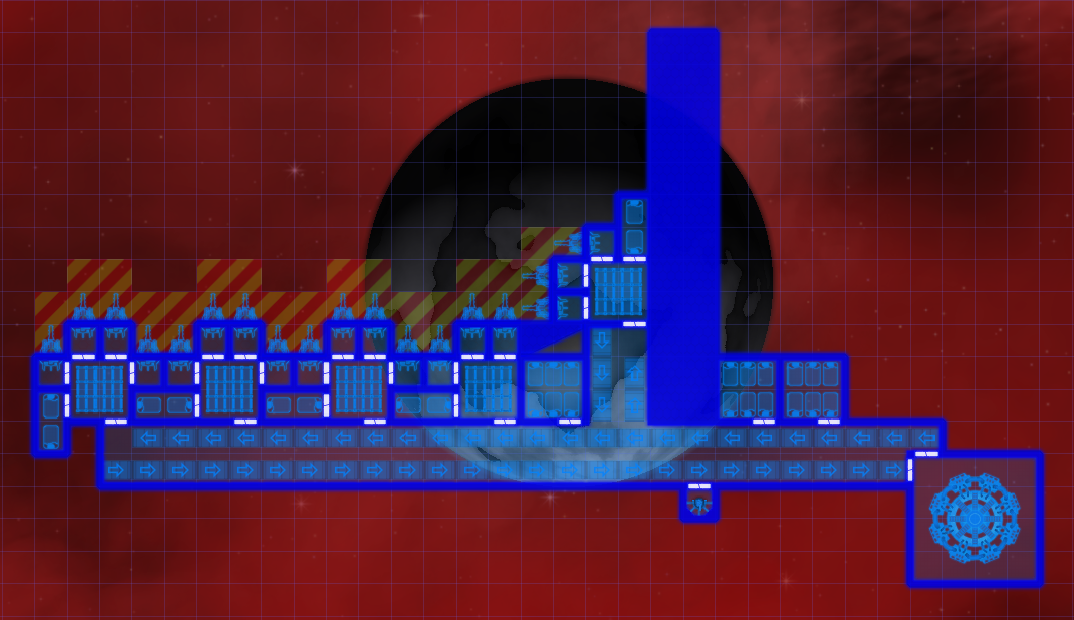
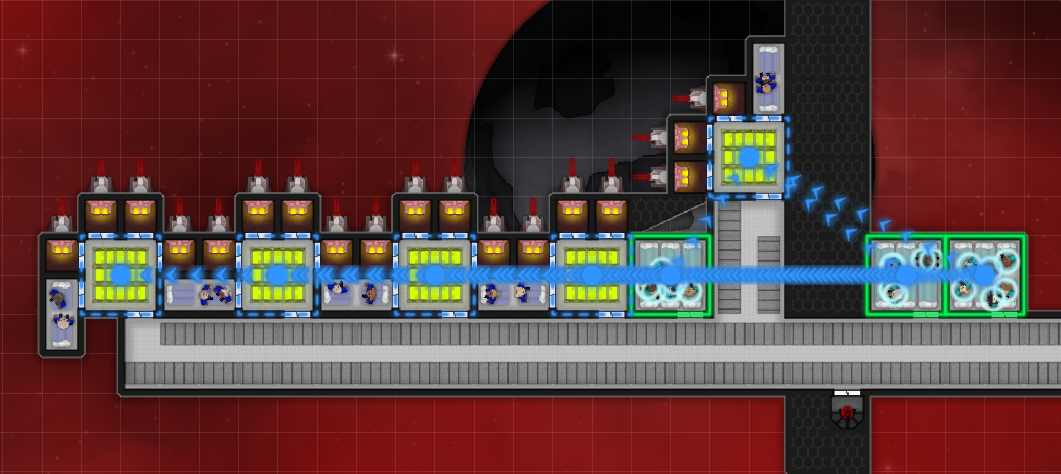
1. Use this efficient missile module when making a linear barge. It has just the right amount of crew, even if the bar says otherwise.
2. Go to the crew management menu and start assigning crew. A single crew quarters can operate and supply one missile launcher, as long as it is adjacent to a factory. For each tile of corridor away from the missile factory the crew needs increase exponentially. In this case, two extra crew are needed per each outer missile launcher, but four extra would be needed if the launchers were three tiles away. Do this for each missile module you use.
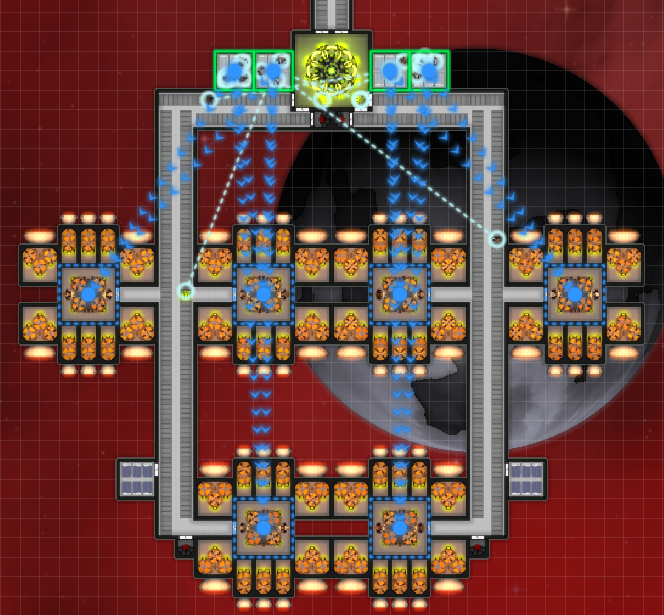
3. Now that the missile crew are assigned, it’s time to assign the power storage(s), reactor(s), and factories. Remember to assign your reactor(s) to all the storages and parts you want them to power.
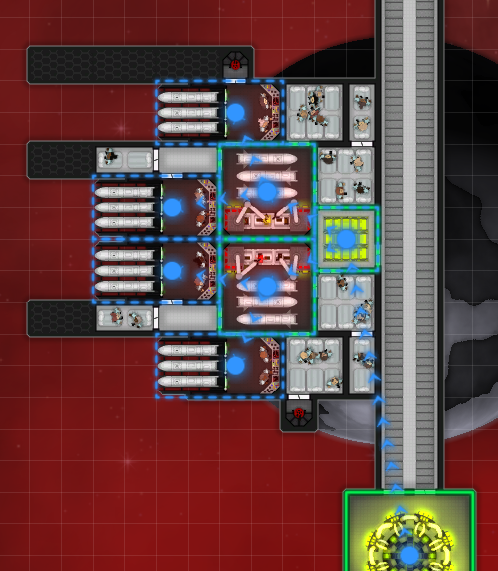
4. Lastly, it’s time to use those crew roles I talked about before. Turn the two remaining unassigned bunks in the missile module into distributors and assign them to the storage. Then, add a crew quarters and make them power storage supply crew, then assign them to the storage as well. If you’ve set everything up right the power storage supply crew should take power from the reactor to the power storage, the distributor crew should take power from the storage to the missile factories, and the default crew should bring missiles from the factories to the launchers. Remember to test it by autofiring and get rid of any extra power supply crew sitting in their rooms. Also remember to assign crew to fire extinguishers near/ along their routes.
Note: You can’t assign factories to launchers set to a different missile/mine type.

Thrusters:
Thrusters don’t require much complicated assignment most of the time (usually just direct assigning), but I still think it’s important to go over the times where it can help.
1. The most important thing to keep in mind for thrusters is that you want to be powering all of them with the power distribution of engine rooms. Crew walking through non-corridor rooms to power thrusters is never ideal. Something like this thruster block will work well, so I’ll be using a few of them as an example.
2. First, assign the reactor to the engine rooms. Usually, thrusters don’t require power storage relays, but if some of your thrusters are flickering a noticeable amount during battle you may consider using relays, in which case you’d do something similar to the assignment in the missile section. For this layout though, the assignment is simpler.
3. Next, select the crew on each side of your reactor and assign them to the engine rooms on their side. You don’t want to assign them to the engine rooms on the other side since they will lose efficiency moving through the reactor. Remember to assign crew to fire extinguishers near/ along their routes.
4. Finally, select your farthest-away crew quarters and make them operators, then assign them to the engine rooms.
Ions:
With how much power ions use crew assignment is very important to keep them supplied on most ships. I’ll be going over the most basic direct-assignment-only method, though like with all weapons using operator crew is also an option.
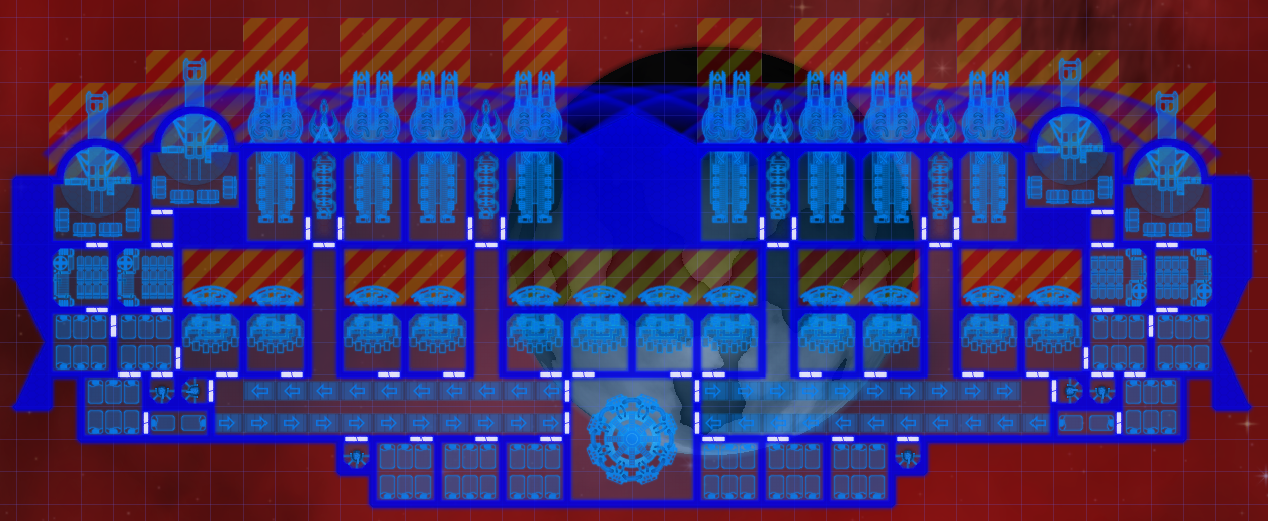
1. This time I’m going to be walking you through how to set everything up for an ion and thruster combo situation. Here’s the example. Keep in mind there’s power left for two more thruster blocks or some ion tunnel shielding, but this is just focusing on the ions and thrusters next to them.

2. First, assign the reactor to the ions and engine rooms since that’s all it is powering currently.
3. Then, assign the central crew to the central ion beams. When adjacent to a large reactor, ions only require one crew to supply them, but this significantly increases the farther away they get. Because of this, these two crew quarters will be able to fully supply all four central ions.

4. Next, assign the outer crew quarters to both the outer ions and engine rooms on their side of the reactor. If you notice flickering while autofiring the ions don’t worry, there’s no need to add more crew since ions and thrusters won’t be firing 100% of the time during battle anyway.
5. Finally, add two bunks, then make them operators and assign them to the engine rooms. Usually, when it comes to an entire ship, it’s a good idea to count up how much crew you need to operate all of your engine rooms, and then add the correct amount of crew quarters after you’re sure you are done with your thrusters. In this example, there are only two, but on your ship, there might be 6+.
Cannons and HLs:
Crew assignment for cannons isn’t very complicated, but I’ll be going over how to assign your crew for a mixed cannon and HL module with shields.
1. This is the example I’ll be showing. It’s pretty much an optimal cannon and HL setup so feel free to use it, though there are some tweaks you can make based on preference.
2. Since the large reactor is going to power everything (even though there is some excess it’s hard to use) there’s no need to assign it to anything. Instead, the first thing to assign is the cannon crew. When ammo factories are buffed (due to adjacency) like they are here, three crew is all that’s needed to supply each one. So, select a crew bunk on each side and assign it to both cannons like so.
3. Next, select the central crew and make them power distributors, then assign them to every power-needing part on their respective sides.
4. Finally, it’s time to assign the operators. Select the remaining crew rooms on each side and give them the operator role. Assuming you have the right amount, assign them to every weapon on their respective sides.
Point defense (PD):
Point defense is currently the best missile defense due to its wide firing arc and the amount of excess power on ships using large reactors. Crew management is required to make PD work efficiently, so I thought I’d write up a bit about it.
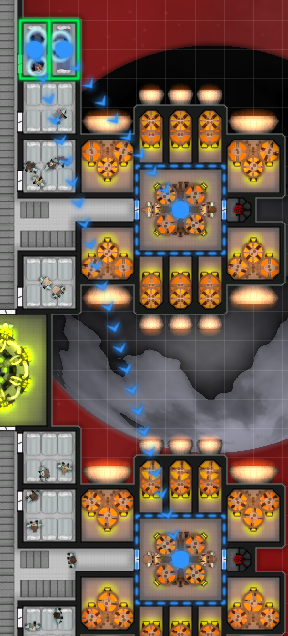
1. Here’s a simplified PD “wing” on a TB railfan. Keep in mind the reactor on the side is also most likely powering two railguns, four shields, three TB, and four thruster blocks.
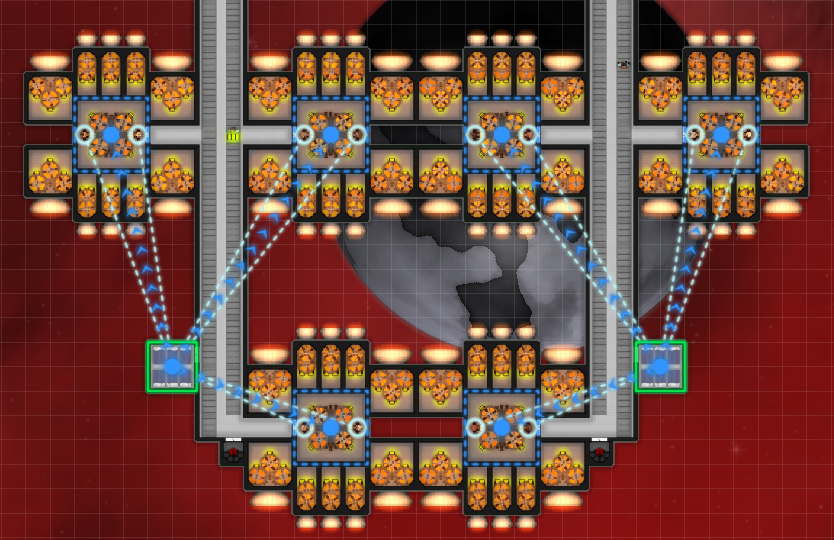
2. First, select the reactor and assign it to all the storages. Also, select the storages and assign them to the adjacent PD.
3. Next, select all the bunks and make them power distribution crew. Then, assign them to their respective storages.
4. Finally, select the three crew quarters and make them power storage supply crew, then assign them to the storages.
Other:
There are some notes I have about using crew management, and operator crew in particular.
Firstly, pretty much any manned part benefits from the use of an operator role. All the step-by-step walkthroughs I did above can also be done with operator crew manning the missiles and ions, or whatever weapon you like. Cannons benefit from this quite a bit on heavily shielded designs where it’s hard to fit crew rooms close by.
Another thing I’d like to mention is operator armor. Since operator crew rooms don’t need to be close to the parts they operate they can be used as pseudo-armor and placed at the front of your ship, or wherever you need a little extra protection.
Lastly, remember to assign some of your crew to your control room(s)! If you need to you can go into your role settings and make both of the CR priorities 10.
The why
I’ve talked alot about the how, but now it’s time for the why. This is a completely optional section. None of this information is need-to-know. If you don’t want to read this feel free to scroll down to the conclusion, otherwise I’ll continue on.
So, you may be wondering why I say to direct assign all these parts, and why I say to use these roles. I’ll go over some of the reasons in this section.
Using power storage relays:
I’ve talked before about using storage relays to supply far-away parts with large reactors, but why? Well, the simple answer is that it decreases response time.
For example, if you are powering parts long-distance with a large reactor and a shield goes down, the crew then have to run to the reactor, wait to pick up a battery, and then run all the way to the shield which could be upward of 20 tiles away.
In the case that you have a power storage, your power distributor crew can instantly pick up the batteries they need from the storage and bring them to the shield. This doesn’t mean that power storage relays are to be used for everything though. Power storage is mostly useful for parts like shields, far away missile factories, PD, and far away thrusters. Why? Well, missile factories draw a lot of power, and the response time of a large reactor beyond around 10 tiles is too slow to keep them powered. In the case of PD, it can only hold two small batteries worth of power at any one time, so a large reactor battery is wasted on it. Also, PD has a high power draw and needs storage to reduce response time.
Assigning storages, factories, and reactors:
I’ve said to always assign these things to the parts you want them to supply. I went a little bit into why when I gave the example about the HLs and the shields, but it’s a little more complicated than that.
In most ships using large reactors, the logistics can be pretty complicated. Often, your large reactor or reactors are going to have to supply the entire ship. The crew in Cosmoteer without direct assignment can be pretty dumb sometimes and may bring power from a storage (or reactor) at the front of your ship to thrusters at the very back, which obviously decreases efficiency.
The biggest reason why assigning storages, factories, and reactors to the parts you want them to supply is so highly suggested is because of that. When they are directly assigned you can trust that your crew won’t do anything stupid. Let’s say you’re making a ship with PD for missile defense and you’re using power storage relays. If you forget to assign your storages it is likely that your power distribution crew might bring power to a PD in another module.
Assigning crew:
Assigning power storages, reactors, and factories cuts down on a lot of stupid crew decisions, but crew can still get pulled for jobs all over a ship, even if ones closer have higher priority. In the case of ions, crew without assignment might run from one side of a large reactor to power an ion on the other side, and then back again. Since rooms (non-corridor or walkway parts) decrease crew speed by 50% there is a lot of wasted time that could have been used to supply the same ion the crew member was already at.
Basically, crew doing the same task over and over is a lot more efficient than switching tasks, since the travel time is lost productivity.
Using crew roles:
I already went into why crew roles can be helpful, but I want to reiterate that crew roles fill the gaps that direct assignment leaves.
For example, you are making a TB railfan and you need a role to only supply ammo to an ammo storage relay. If you just assigned a crew quarters to the storage it would both supply ammo to the storage and to the rails. In this case, doing both would mean the crew are walking through the storage to supply the rails, and then getting pulled to supply the ammo storage and walking back through it again. It’s just more efficient to have separate crew for supplying the rails.
If you instead assign the quarters to the factory they will both power the factory and supply the storage with ammo (assuming you assigned the factory to the storage) which means they would run all the way back to your reactor to grab batteries and then back to the factory. It’s just more efficient to have your power supply crew supplying power to the ammo factory.
So, if you set up your storage supply role right it should stay in the same back and forth loop and not go on any unnecessary trips through rooms that slow them down.
Conclusion
So, hopefully, you learned something about crew management. Remember that this is an introduction (though a comprehensive one) so I didn’t go into every single use case or situation, but what I did include should be enough to significantly improve efficiency.
Feel free to post questions or share your own crew management logistics for feedback!